DIY Patriotic Grain Sack Tuck Pillows

Mini-pillows are such versatile pieces of decor. Use them as shelf tucks, bowl filler, or tiered tray decor, and they are equally adorable in every setting. These patriotic mini-pillows are simple to make and take very little time to add a sweet touch of Americana to your home!
You might have noticed that I’ve been bitten by the crafting bug lately.
First, I made a bunch of farmhouse fabric stars that are tucked all over within my decor right now.
Next, I made fabric star garlands to drape on our shelves. I adore them, and I’m still working to make more because I keep finding new places to add them!

Then, I wanted something cute for my tiered tray, so I whipped up these patriotic mini-pillows, and they look so adorable–if I do say so myself!
Using this tutorial and my printable patterns, you can make some for your own decor in no time flat! They’re also perfect for things like teachers’ gifts, or to add to a house-warming gift basket.
The possibilities are endless!

I’ll be demonstrating how to make these patriotic mini-pillows using the square pillow with the star pattern. You can get my printable star pattern here for use in lots of other projects.
I also created a printable pattern for the mini flag pillow. The technique to make them is the same, and my pattern will help you right-size everything because the dimensions of the flag pattern are scaled to maintain the
true aspect ratio of a full-sized American flag.
Now, let’s get crafting, and be sure to pin this post so you can find the step-by-step photo tutorial again later!


Disclosure: This is not a sponsored post, and I have received no compensation for sharing anything that follows. Some links within this blog may be affiliate links, and I might earn a commission if you make a purchase through that link. This usually amounts to cents, not dollars, and helps to support the projects featured on this blog. I only recommend products from companies that I have found to be trustworthy. Read my full disclosure here.
I made these mini-pillows completely from scratch using grain sack fabric for the base, plus red ticking and blue denim. Of course, you could make them in lots of different colors and fabrics depending on your preferences.
If you don’t own a sewing machine, you could certainly hand-stitch these, as well…especially since they’re not too big. If you do, just reduce the seam allowance, and use this easy hand-stitching technique to make a cute farmhouse style edge around your pillow.
Even kiddos can make these pillows, and it’s a terrific way for them to learn basic sewing skills!
HOW TO MAKE PATRIOTIC MINI-PILLOWS


- Fabric of your choice (I used grain sack, denim, and red ticking)
- Poly-fil
- Straight pins
- Scissors
- Pencil
- Star Template (free printable star pattern you can download here)
- Flag Template (if you’re making the flag pillow, you can download that pattern here)
- Laminator (optional, but I highly encourage it)
- Sewing machine
- Iron and ironing board


1. Gather all of your supplies. Although it’s optional, using a laminator to add extra strength to your patterns is a great idea if you plan to reuse them over and over. This is the one we own, and it’s been problem-free for nearly seven years!

2. Trace the 4″ star pattern onto your fabric. My pattern includes templates for stars ranging from 2″ to 6″, so you can certainly adjust the size if you’d like to make different designs!

3. Cut two pieces of 6″ square fabric. These will be the pillow. I used grain sack fabric that did not have a “right” side, but if you choose fabric that does, make sure to pay attention to which side you’re working with in the next steps.

4. Pin your star to the one of the pillow pieces. Top stitch the star in place. The seam allowance you decide to use for top stitching will determine how much the edges of the star will fray–choose to your liking.
Next, place the second pillow piece on top of this piece–right sides facing together so that the star is now in between the two pieces. Stitch around the square with a 1/2″ seam allowance, leaving a couple inches open for turning right-side-out and stuffing.

5. After stitching, press open the seam where the opening is.

6. If you’ve pressed the seam correctly, it will look like the picture above. Notice the opening where you’ll turn the piece right-side-out and add the stuffing.

7. Before turning right-side-out, nip the corners of your fabric with your scissors. This will help to reduce the fabric bulking in the corners.

8. Once your pillow is turned right-side-out, fray the edges of the star applique by running your fingernail across the edge and gently tugging the strands of the fabric.

9. Carefully trim the frayed edges of the star to make everything look nice and neat.

10. Stuff the pillow with poly-fil. You can decide how full you like the stuffing, and you could even add weighted pellets to the bottom edge, if you like.

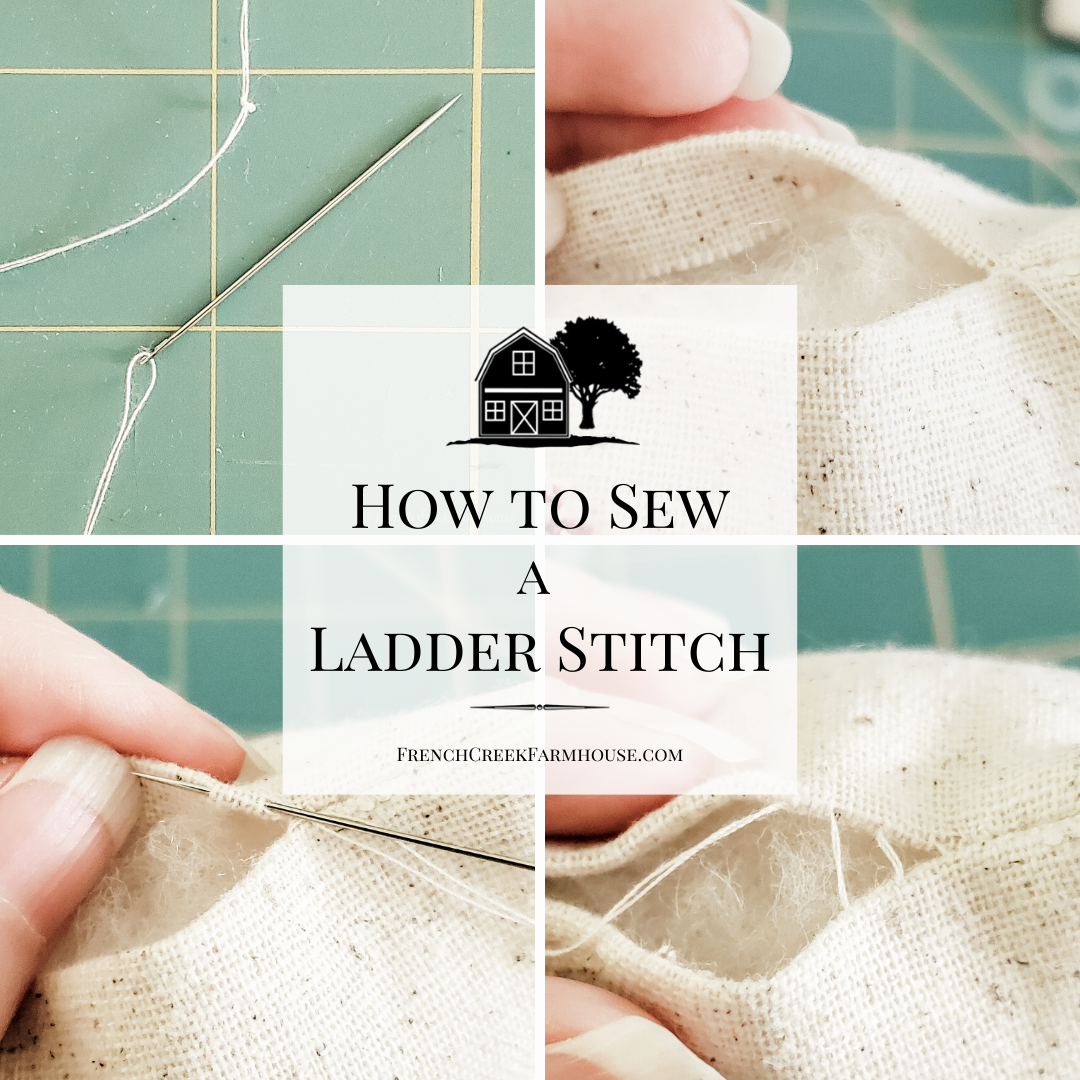
11. Close up the opening using the ladder stitch. This is a very simple invisible stitch that will make the seam perfectly aligned and neat.

12. Knot, and then lose your thread within the pillow.

If you’d like to make the coordinating flag mini-pillow, you can find the printable pattern for it here!
The technique to stitch the pillow together is exactly the same, but my flag pattern is scaled to make the flag with a realistic proportions compared to a full-size American flag.
Need more patriotic DIYs?

If you enjoyed this project, be sure to sign up for my newsletter, and never miss another DIY! You’ll get access to all of my FREE printables, patterns, and lots more!
To find more of my past DIY projects, just click on any category:
Crafts | Sewing | Fixer Upper Farmhouse Renovations


Kristi, these little pillows are so cute! I really wish that I had a more crafty mindset and could get into creating such lovely things as these! Thanks for sharing and linking with me.
Shelbee
http://www.shelbeeontheedge.com
Thanks so much, Shelbee! Hope you're able to craft some up with these patterns…so easy, and so fun! xo
Love your pillows and your other decor! Thanks for sharing at Friday Favorites. I'm featuring you this week.
Oh wow, Jerri! How kind of you to feature my project–thank you so much! xo